Bird-friendly Building Design Comes to CALGreen

On July 1, 2024 CALGreen’s Intervening Code Cycle update went into effect, adding new mandatory measures addressing embodied carbon for some large nonresidential projects and updates to EV parking requirements. It also introduced a new voluntary Tier 1 measure regarding bird-friendly building design. There is a clear connection to the LEED Innovation in Design credit: Bird Collision Deterrence. When measures start showing up in both the CALGreen Code and LEED, it can be an indication that they address some best practices and that in the future may be moving toward a mandatory measure; especially in this case, where it was deemed important enough to add prior to the 2025 code release.

Hundreds of millions of birds die each year in the United States due to collisions with buildings, and many more are injured. More glazing is being seen in all types of construction, from tall skyscrapers to residential projects. With that increase in glass, bird collisions are on the rise. The goal of bird-friendly design is pretty self-explanatory, incorporate features into the building design that reduce bird injury and mortality from in-flight collisions with buildings. CALGreen aims to provide a uniform guideline for bird-friendly building standards for the planning and design processes. The idea is to utilize strategies that make the built environment safer for birds without totally obstructing occupant views and connections to the outdoors.

Large pane of glass appearing to be a pathway (Source: American Bird Conservancy, Bird-Friendly Building Design)

To understand what strategies are effective, we need to understand what site elements and glazing properties create risks for birds. First, a building’s lighting, both interior and exterior, can disorient birds and impact visibility for those that migrate at night. LEED requires projects to meet the uplight and light trespass requirements in the Light Pollution Reduction credit. CALGreen requires nighttime lighting at the top of the building and in the interiors of all areas visible through exterior glazing to be controlled with time-switch control devices or occupancy sensors.

A second hazard pertains to glazing properties, where reflections and transparency can make it hard for birds to realize they are flying toward windows, rather than pathways to more vegetation. Lighting and time of day can affect the appearance of that glass.

To mitigate these hazards, CALGreen voluntary measure requires treatment to:

· At least 90% of glazing on a building elevation between grade and a height of 40 feet AND

· At least 60% of glazing on a building elevation from 40 feet above grade to the top of the building elevation.

 Similarly, LEED breaks down the building façade into:

· Façade 1, the first 40 feet above grade and 12 feet above any green roof

· Façade 2, all façade areas between 40-100 feet.

Rather than requiring a percentage of the glazing needing treatment, LEED uses a calculation based on material areas and material threat factors to determine the total building Bird Collision Rating. In addition to glazing on the building façade, LEED also addresses handrails, guardrails, windscreens, noise barriers, gazebos, pool safety fencing, bus shelters, band shells, and other structures.

Strategies that minimize the risk of birds colliding with buildings can either be directly on the glazing or on other features that create a visible barrier. Some of those include:

Glazing visual markers:

  • Etched or fritted glass with patterns no more than 2 inches apart

  • Interior or exterior glazing film with 2”x2” visual markers

  • Laminated glass with 2”x2” visual markers, patterned Ultraviolet (UV) coating or use of contrasting patterned UV-absorbing and UV-reflecting films

  • Glass block or channel glass

  • Other developed glazing technologies documented to reduce bird strikes, tested by an independent third party and approved by the authority having jurisdiction

Slats, screens, netting, louvers:

  • Horizontal or vertical slats of 1/8” minimum face width with minimum 2” spacing that obscure 85% or more of glass

  • Grilles, screens, or 1/8” diameter welded wire mesh with openings no more than 2” maximum horizontally and vertically

  • Netting with 1” maximum openings

  • Sunshades or louvers 9” deep vertically spaced a maximum 9” or 6” deep horizontally at maximum 6” spacing

Many of these strategies follow the 2” x 2” Rule which, derived from research on songbirds, found that horizontal or vertical lines two or fewer inches apart tend to deter birds from colliding with buildings. This can be seen in the examples below from the American Bird Conservancy’s Bird-Friendly Building Design Guide resource.

From left to right they are: Philadelphia Zoo Bear Country exhibit with window film; Consilium Towers, mirror-glass complex in Toronto, with Feather Friendly dot pattern; and Ornilux Mikado’s pattern reflects UV wavelengths that birds are sensitive to. The spiderweb effect is visible to humans only from very limited viewing angles.

Bird-friendly building design is a reminder that our built environment is an extension of the environment around us, not separate from it. We must remember the impacts our buildings have to the wildlife around us and do what we can to mitigate damage.

For the full code language, please reference the CALGreen Code Section A5.107 Bird-friendly building design and the LEED Innovation: Bird Collision Deterrence credit language. Resources like the American Bird Conservancy and the National Audubon Society have more information regarding effective bird-friendly strategies.

LEED v5: Focus on Decarbonization

It’s coming… USGBC is preparing to launch the next iteration – v5 – of its rating system in the next year. This new version represents a significant shift in how the system is conceptualized, with some impacts on point distribution. Broadly speaking, LEED is utilizing three impact categories as an organizing framework:

·      Decarbonization (50%)

·      Quality of Life (25%)

·      Ecological Conservation & Restoration (25%)

Proposed LEED v5 checklist

These impact categories are distributed across existing credit categories and will apply to all rating systems. So what does this mean for LEED projects in the future? And how does California’s emphasis on decarbonization and electrification align with LEED’s priorities?

USGBC’s overarching goal for LEED v5 is to “drive the industry toward a decarbonized built environment across all major sources of emissions: operational, embodied and transportation.” This requires carbon literacy among practitioners regarding both sources of emissions and reduction opportunities.

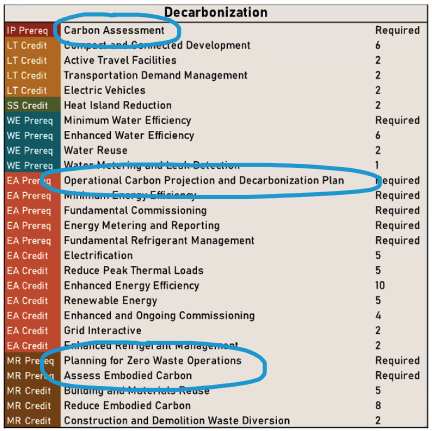
In that vein, they are taking guidance from the adage “You can’t manage what you don’t measure” and introducing new prerequisites that aim to build a project team’s carbon awareness. They are:

LEED v5 credits addressing decarbonization goals and strategies

  • Carbon Assessment (Integrative Process)

  • Operational Carbon Projection and Decarbonization Plan ( Energy & Atmosphere)

  • Assess Embodied Carbon and Planning for Zero Waste Operations (Materials & Resources)


There are also new credits available for projects that achieve carbon reductions via “Electrification” (5 pts) and “Reducing Embodied Carbon” (8 pts). These credits support California code updates that reward – and in some cases require – new residential projects to incorporate heat pumps for space conditioning and water heating and solar panels as an electricity source.

An often overlooked source of greenhouse gas emissions is refrigerants. An update to the Fundamental Refrigerant Management prerequisite limits projects to refrigerants with low global warming potential (defined as <700), effectively prohibiting the use of common refrigerants like R410a and R134a, which have GWPs of 2088 and 1034 respectively.

Beyond these building-based direct impacts on U.S. carbon emissions, the updated rating system is also addressing indirect impacts of the building sector through enhanced credits in the Location and Transportation category (now worth 15 pts) and with a new prerequisite called “Planning for Zero Waste Operations.”

This is a lot. And while these changes are yet to be finalized, the ultimate goal is to empower project teams to leverage the many ways our work impacts carbon and other greenhouse gas emissions. Have a project targeting low or zero carbon? Reach out!

Right-sizing Insulation for the Wall Cavity

In the low-hanging-fruit category of energy performance, correctly specifying and installing insulation is near the top of the list. Still, we frequently see insulation thickness that is not in alignment with the size of the wall cavity or an installation that doesn’t fit tightly.  Two big issues to address, both in the construction documents and in the field, are compression and gaps.

Compression reduces R-values

Compression can occur when the thickness of insulation required for the R-value is too large for the size of the studs. Not uncommon, the inconsistency could stem from a change of wall thickness due to plumbing conflicts, structural analysis, product availability, Title 24 requirements, etc. The impacts, though, are significant. For example, R-19 batt insulation that is 5.5” thick fully ‘lofted’ would fit in a nominal 2x6 cavity. Shove that same insulation into a 2x4 wall, and the effective R-value drops to R-12! Compression also occurs when insulation is pushed behind a pipe or conduit instead of cut around it, or when a framing bay is narrower than a nominal 16” space and the installer doesn’t cut the width of the batt.

Gaps could allow convection and condensation

Properly installed wall insulation has contact to all 6 surfaces of the stud cavity: at the header and footer, at the stud on either side, to the outside wall and to the inside wall. We put emphasis on this last surface because we often see insulation that is pushed into the cavity so much that when the sheetrock is installed there could be an inch or more gap between the insulation and the sixth surface. Be sure that batt insulation fully touches the outside wall and is fully lofted to the interior. If there is vertical airgap, convection could occur within the wall cavity, which tremendously reduces the effective R-value.

Gaps can also occur at the top of the cavity, either if insulation isn’t installed correctly or if it slumps over time. The gap at the top of a cavity is concerning as moist interior air could come into contact with a cold exterior wall, causing condensation. Condensation, of course, could lead to mold growth and health concerns.

Tips for getting the best fit

Interested in getting the best performance from your insulation? Here are few tips to consider:

·       Include a Quality Insulation Installation (QII) HERS verification as part of your project. QII applies to residential and non-residential projects, as well as new construction or alterations and covers air sealing as well as insulation.

·       Don’t just leave it to the Title 24 report - add notes to your construction drawing indicating expectations for a QII-level of installation.

·       Whether you are the owner, architect or builder, require a meeting with the insulation subcontractor prior to the start of work and communicate expectations at that time. Trouble-shoot difficult areas and discuss the company’s own quality-control process and employee training program.

·       Consider using a blown-in cellulose or similar product that fills the cavity more easily.


Looking for more information about appropriate insulation implementation? Check out the Quality Insulation Installation (QII) Handbook, developed by CalCERTS,  Questions on energy performance or Title 24 energy compliance? Reach out.